We may earn money or products from the companies mentioned in this post.
Have you ever wondered why your barber measures and eyeball your hairline before using the barber line up technique? Seriously, they look comparable to a one-eyed pirate. They’re measuring your hairline to give you a crisp edge up with the T-outliners. The technique to shape up the hairline is used by most professional barbers.
I have great news… I will share barber techniques, awesome hairline line up, tips, and pro tricks to help you line yourself up from home. Best of all, the self-edge up process will take 15 minutes or less to complete. You’ll be able to give yourself quality shape up’s without leaving the comfort of your own home. The combination of learning the edge up technique and how to fade hair from home will be beneficial to you in the long run.
It is important to build a foundation before you can learn the tips of a clean line up. That is why I feel we should cover the basics. This will allow you to have a better understanding of the techniques and the reason for using them. Let’s go over what the barber line up technique is.

Amazon Audible Premium Plus Annual Membership is the way to go if you’re looking for an affordable way to enjoy your favorite books.
Click here for Amazon Annual Audible Membership!
What is barber line up techniques?
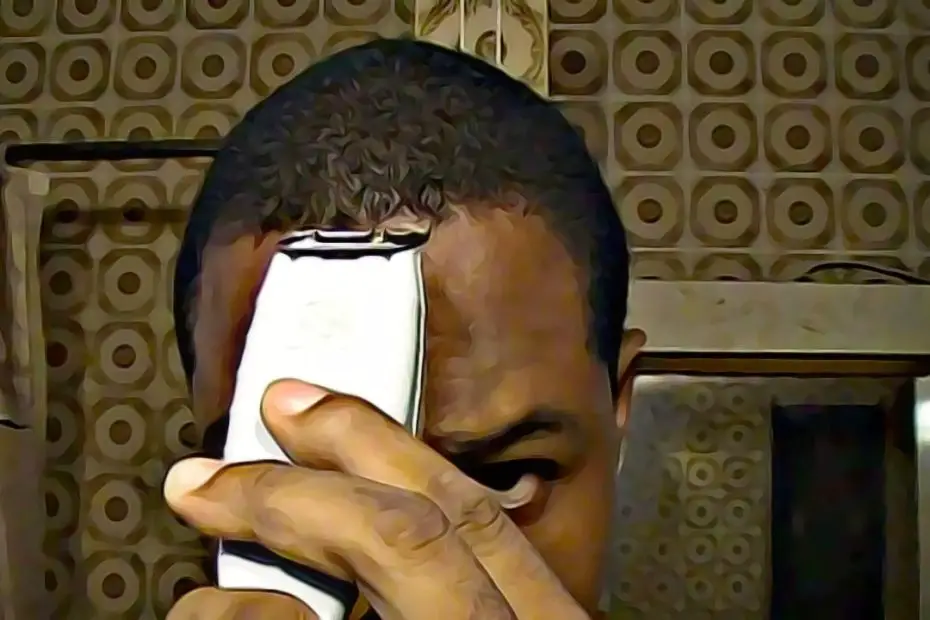
The barber line up technique is a method of visualizing, measuring, and shaping the natural hairline with a T-outliner. The edge up procedure is performed after a haircut has been completed. Note, the shape up haircut consists of lining up the hairline, temple hairline curves, sideburns, and rear neckline.
Now that we got that out of the way… Let’s go over some information to help improve your self-line up skills.
When was the shape-ups introduced, and how did it gain popularity?
In the ’60s and ’70s the big afro was a sign of black pride, power and was extremely popular during the time. However, by the mid-’80s many African American males began to lower their afros. The changing of the guard brought the emergence of hairstyles such as the baby afro and the clean Caesar haircut. The lower haircuts allowed more flexibility and creativity… Which resulted in what is now known as edge up, line up or, shape up. The shaped hairline is currently a staple in black male haircuts.
Thanks to icons who influenced hip-hop and sports the shape up became the forefront of pop culture! After the mid 80’s the line up was connected to the fade haircuts, and commonly associated with entertainers and basketball players. Guy’s like Rakim, LL Cool J and, Michael Jordan popularized the high-top fade and black Caesar haircut with the shape-up hairline.
The long-lasting impact of the shape up has stood the test of time. Think about it, after thirty-plus years the edge up in haircuts is present with just about every hairstyle today! From the tapered dreads to bald fade, a variation of the shape up is present.
What makes the Barber line up technique special?
I stated earlier that the line up technique is a method of measuring the hairline and the process of straightening it out. Note, the edge up usually occur after the hair has been lowered and styled with hair trimmers. However, I should also point out, shaping of the hairline can also be a standalone procedure without an actual haircut.
The edge up technique is special because of the considerable amount of focus, skill, and precision required for a perfect line up. Whether you’re getting lined up by a barber or shaping up yourself, the procedure requires a high level of concentration. Not everyone is skilled or patient enough to complete the featured line up correctly. A haircut can easily be ruined with an uneven shape up or if the lining is pushed too far back.
Key factors to making barber line up technique special
- Skills – Understanding how to shape up the hairline has a direct impact on how the hairline appearance turns out.
- Patience – Taking your time while lining up the hairline is key when attempting to avoid mistakes during haircuts.
- Concentration – Paying attention to the intricate details of the hairline is an important factor for a clean line up technique. While you’re shaping up your hairline it is important to focus and avoid distractions.
- Mobility – Steady hand movement and fluid hand motion is a factor when it comes to barber line up techniques. The ability to maneuver with a T-outliner dictates the hairline straightness during an in-home or barbershop edge up.
- Calculation – That’s right, calculation! Calculating and measuring the hairline is the secret key to the self-line up technique! Before your barber place an edge clipper on your head, they’re measuring and calculating the distance and angles of your hairline. It’s like mathematics!
The five factors are what creates the special allure of the shape up technique for most barbers and people edging up themselves. When the shape up is done correctly it enhances the haircut, as they say… The minor hair procedure is the icing of a good haircut.
Will the barber line up technique work on receding hairline?
Often, men begin to experience signs of mature hairline or baldness by their 30’s. The transition in the male hairline can complicate how the edge up technique is used. You can still use the shaping technique on your hairline when receding. However, you should note that your edge up may be flawed due to an uneven frontal hairline.
Though most receding hairlines can be shaped up, it may be difficult to use the barber shape up technique on yourself. Depending on how severe your mature hairline is, you may need assistance… Honestly, if you’re a beginner and have a V-shaped hairline you may be better off going to a barber for your line up.
For those of you with slightly receding hairline, a self line up is very possible! You will certainly need to pay close attention to what you’re doing while lining yourself up at home. Note, if your hairline is crooked, you’ll need to slightly push back your frontal line to get a straight shape up.
DIY line up from home may seem a little intimidating if you’re experiencing maturing hairline. Seriously, don’t let a little imperfection scare you off! You can still achieve a clean shape up with flaws such as a slanted or widows peak hairline. I’ll give you the proper shape up technique to edge a widows peak or crooked hairline later in the article.
I am sure it is a devastating feeling to lose your hair or experiencing mature hairline at an early age. 5 to 10 years ago your only options were to either rock the Jefferson baldy or shave your head completely bald… With Hims hair loss treatment products on the market, those are no longer your only options. Visit Forhims.com for more information and the steps to saving your hair!
How often should you shape yourself up?
Shape-up’s, line up’s or edge-up’s are the basic structural outline for haircuts. When the hairline regrows to its natural shape, that is usually an indication it is time for an edge up. A client recently posed the question, how often should you get a line up and when is it too much?
Before we can get to how often you should get a line up, let’s go over a couple of quick questions!
How long does a shape up last?
Typically, a shape up last about two to three weeks. The hairline goes through its natural growth cycle even after it has been lined up. Keep in mind, the hair will start to grow in the hairlines natural shape with stubbles of short hairs.
Now that you know how long it takes for the hairline to grow back after an edge up… The question remains, how often should you shape up your hairline? Typically, you want to line up yourself once or twice a month. Doing so will reduce the visibility of the regrowing of hair stubble of your natural hairline.
Keep in mind that you do not want to over cut your hairline… Like they say, too much of something is never good. When you edge yourself up too much it could start skin discoloration or bumps on your forehead.
Do I need a T- outliner for a straight hairline line up?
For the best DIY edge up results, you will need a good t outliner. The outliner is the tool that allows you to cut hair and shape up the hairline. The liners are made up of two replaceable carbon steel blades for long last use. There is an upper and a lower blade that allows for easy cleaning and adjustability.
To assure a perfect self line up, there are a few things that you’ll need to routinely do to keep up the maintenance of your hairline liners. Let’s look at something you can do to assure that your liners last longer and provide perfect shape up!
Cleaning – It is important to sanitize your t outliner blades before and after every self shape up! Doing so will reduce skin irritations like bumps on the hairline and neckline. Note, over time your clipper builds up muck and needs to routinely clean so that it continues to work properly.
Oiling – One way to assure a good DIY line up is to regularly oil the blade of your t outliner with WD-40. This will reduce the heat from the hair liners friction which causes skin burns. Routinely oiling the blades will help the clippers perform better.
Adjusting – I mention earlier that it is important to keep your t-outliners blades clean… it is equally important to take the clipper blades off to remove gunk build up and make adjustments. When you adjust your hairline clippers it resets them for better shape ups. 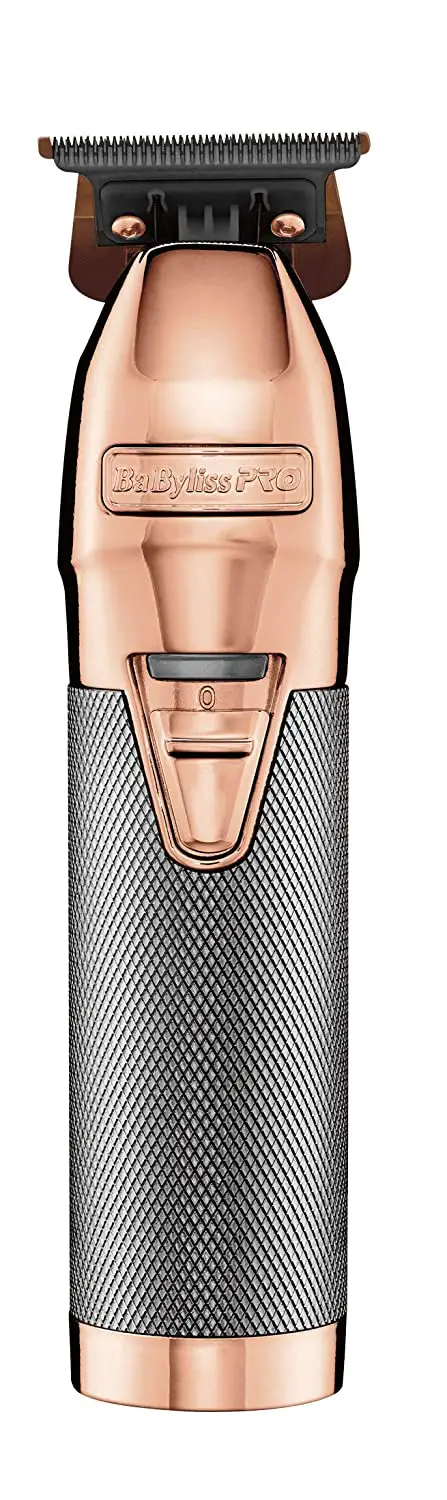
Consider purchasing a BabylissPro MetalFX T-Liner on Amazon to fix or straighten any crooked edge up. It’s important to have high-quality tools to get the best results you want.
Read this in-depth guide to buying The Top 10 Best Edgers for black hair!
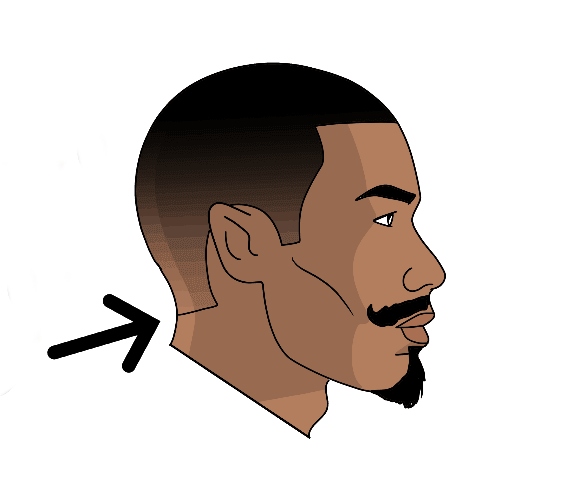
Is the rear neckline included in the line up technique?
Most people associate edge ups with the frontal hairline and sideburns, but everyone seems to forget about the neckline. Keep in mind, the back neckline is included in a completed line up! When you shape yourself up, it is a bit difficult to edge up the back of the neck on your own. However, it is not impossible, you’ll need a mirror and extreme focus!
The barber line up technique uses measurement to pinpoint the starting point of the neckline edge up. During a home haircut, you’ll need to allow yourself room for error by creating an outline with the liners before actually shaping the neckline. Note, edging the neckline is by far the hardest area of the to shape in a self edge up.
Once you have lined up your neckline in the back, you must shave the excess hair on your neck. This will make the neckline shape up look a lot cleaner and make the lining stand out! When you shave the extra hair of the outer neck area be careful not to accidentally shave your neckline shape up.
The benefit of learning self line up technique
This wouldn’t be an Afrocurlsandcuts.com article if I don’t point out the pros and cons of learning to line yourself up. Below you will see the benefits of DIY edge ups as well as what could go wrong with doing your own line up. Keep in mind the factors below aren’t in any specific order but are key elements to the respective sections.
Pro of shaping yourself up
- Cost-efficient – The most obvious benefit of learning to shape up your hairline is it’s cost effective. Think about it, you’re not going to change yourself for a line up, are you? On average, an edge up from a barbershop usually costs about $15 to $20. That adds up over time… To be exact, that’s $390 to $520 a year if you get a line up every 2 weeks.
- Self-reliant – When you learn to line your own hairline, you’ll no longer depend on a barber for a shape up. The flexibility will allow you to line yourself up whenever you want and don’t have to depend on barber hours. Most barbershop hours near me usually range from Tuesday through Sunday 9 am until 7 pm. If you have a last-minute interview on a Monday, you may be S.O.L with current barber hours!
- Longer haircut life – One of the beneficial factors of the self-taught line up is it increase the life of your haircuts. You can expect the life of your haircuts to last at least 2 weeks when you shape yourself up at home. This will essentially help you save money in the long run as well as time. You can’t beat that right!
What could go wrong with a DIY edge up
- Crooked hairline – The problem you may encounter while shaping your hairline up as a beginner, is a crooked line up. If you are not good at using a T-outline you may end up with a bad edge up. This is one downside to lining yourself up if you do not know what you’re doing.
- Purchasing new edge up equipment – This factor could be viewed as a pro or a con. If you’re low on funds having to buy equipment to line up your hairline could be a hindrance. When you factor in the cost of a quality T- outliner, trimmers, and straight razor without other edge up necessities… You’re already anywhere between $150 or higher! However, when you factor in the cost of new equipment compared to the yearly expense of getting barber shape ups it becomes a benefit. Go figure!
- Skin irritation – The self-lining flaw when shaping the hairline improperly causes skin irritations such as bumps, discoloring, and cuts. Often these flaws occur when beginners edging their own hair don’t understand outliner pressure or are shaping up the hairline way too often.
Professional line up technique for lining yourself at home
The professional shape up technique allows you a barbershop shaped up hairline from home. In this section, I’ll detail the barber line up tools you’ll need to edge yourself up.
Items you will need to line yourself up from home
T- Outliner – A T-Outliner trimmer is a fine-cutting tool that allows for extremely close cutting, this is ideal for edge ups and hairline parts design. Note that the T-Outliner is a piece of important equipment needed for a self line up at home. Keep in mind outlining the with T-Blade is also ideal for shaping the beard, mustache, edging around ears, and rear neckline.
Brush – A hairbrush is made up of rigid or soft bore bristle attached to a hard plastic or wood piece and handle. Note, the bristle hairbrush is used to stimulate blood flow, style, and detangling human hair. The brush is an important tool during the DIY line up process and the difference between perfect or crooked hairline edge up.
Mirror – A mirror is one item you will absolutely need especially when shaping up the back neckline. The mirror during self shape up will reduce mistakes while you’re utilizing the barber line up technique!
Spritz – Spritz hold spray keeps the hairline hair in place for a straighter shape up… Often, the hair in the hairline curls up or moves around because of the vibrations of the outliners. I should point out that hairline spritz isn’t necessary but it’s very helpful for beginners lining themselves up! Purchased Spritz hold on Amazon.com.
Trimmer – Electric hair clippers have two blades oscillate parallelly and in opposite directions from each other to cut hair. Hair trimmers are useful for people with afros or tapered locs by lowering the hairline for better shape up.
Alcohol – The alcohol is used after the edge up is completed to disinfect the hairline and reduce the spread of germs by killing them. Whether you shape your own hairline or you go to a barber for a line-up, it’s important to disinfect to avoid skin irritations.
Steps of barber line up technique for perfect shape up
Without further ado here’s is a step-by-step guide to barber line up technique and how to edge yourself up like a pro. The DIY shape up technique is intended to assist you with tips to allow the best line up from home. Make sure to check your hairline edge up equipment before you start shaping your hairline to avoid errors.
Fresh self line up tips
Prepping the hairline during DIY shape up
The first thing that you’ll need to do before you start lining yourself up is to brush your hair. Brushing the hair will not only detangle knots but also help lay the hair flat on your forehead. Keep in mind when you brush your hair it will remove any lint or residue left on the head.
The next step involves a bottle of hairline spritz hold spray and also your hairbrush. During this phase of prepping the hairline is to dampen your brush with hairline Spritz spray. You can do this by spraying the hairbrush. Do not spray Spritz directly on the hairline, it’ll cause difficulties while cutting the frontal hair with a T-outliner.
Instead, evenly spray the hairbrush with hold spray and gently brush your frontal hairline, temple corners, sideburn, hair around the ears, and rear neckline. Allow the moisture from the hold spritz spray to get onto your hair and skin. Remember not to over saturate the hairline with the liquid hold spray or else you’ll have a hard time shaping your hairline up. Allow the product to dry before moving to the next phase of edging your hairline.
Outline your shape up
Whether you’re a professional barber or beginner lining yourself, it is important to visualize and outline before cutting. Visualizing and outlining the hairline is a key factor in eliminating errors during barber line up techniques.
- Visualize a crisp line up – Before shaping your hairline, take a moment to mentally prepare and map out an approach. This step is even more crucial if you’re a novice self-barber!
- Frontal hairline – Consider spending 1 to 2 minutes looking at your frontal hairline in the mirror and visualize your approach.
- Back neckline – Mentally prepare for shaping up the back neckline by using two mirrors. The way that you approach this technique is by having one self-standing mirror behind you and a small handheld in front. Be sure that you have a clear vision of your rear neckline.
Another option to mapping an approach to line up your back neckline as a beginner is to take photos. Yes, you read that right… Simply take pictures of the back neckline with your phone. Note, the photo will help you envision the neckline but also, you’ll be able to look at it during the edge up.
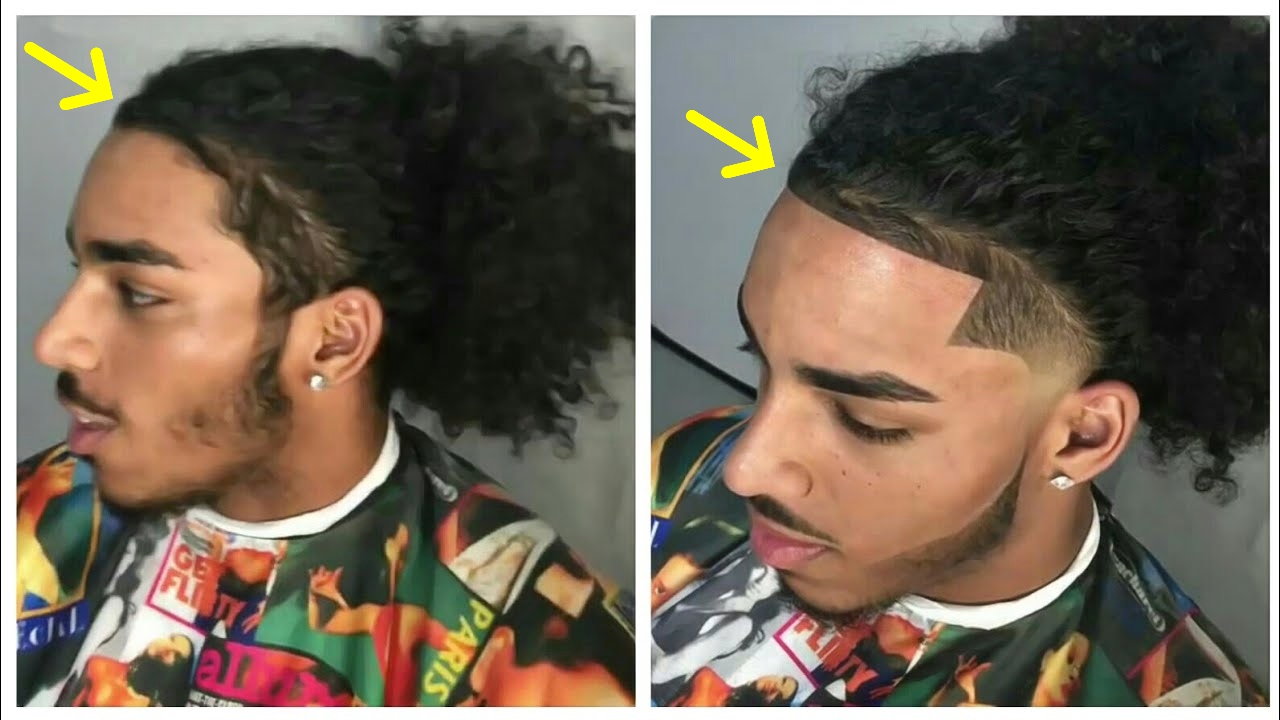
- Outline desired line up – Another beneficial tip for new self-barbers is to outline the hairline with Revo Barber Pencil Kit. The barber pencil will allow you to trace a perfect outline of the hairline line up that you want. Note, the barber pencil kit offers two colors (black and white) to accommodate different skin complexions.
Take baby steps
Often, one of the common causes for a bad home line up is “doing too much” or rushing through the shape up. It is important to take your time and accept your limitations… That means if you’re a beginner, avoid shaping up your hairline without mirrors or with straight razors.
Allow yourself to get better before you line up without a mirror or use a razor to shape your hairline. Those methods are reserved for more advanced barbers… Trust me, you’ll thank me later. Note, beginners risk messing up their line up and could seriously hurt themselves by edging the lining with razors.
Yes, I know the placement of this section is a little odd, but I felt it is important to place it here. Hopefully, it will discourage beginners from attempting advanced techniques during their self shape ups. With that said let’s move on to the next few steps of self line up techniques.
Trim down technique for long hairline self-shape ups
This technique is for people who have longer hairstyles such as tapered dreads, afro fades, or high haircuts. Lowering the frontal hairline before shaping your line allows for a better viewpoint and makes it easier to edge up. Keep in mind, when you trim down your frontal hairline it’ll reduce hair curl-ups while edging up yourself.
I should also point out… The hairline trimming will allow you to use the spritz during your edge up to keep the hair in place.
Hairline trim down
The Lowered frontal hairline only needs to go back about 1 to 1½ centimeters. To clarify, this is about a 1 to 1 ½ centimeter distance between the frontal hairline and trim down stopping point. Keep in mind, going further than 1½ will look weird and even appear as you’re balding or thinning hair.
Hairline trim down technique
The best technique to lower the frontal hairline is to use a hair trimmer, 1.5 guard, comb, and hair tie.
3 step hairline trim technique
- First step – Pull the hair back into a bun by tying it with either a hair tie or a rubber band. This will keep the rest of the hair out of the way and also give you a clear view of the hairline.
- Second step – Part a centimeter length with the comb, once you have a clear separation of trim stopping point, you can start trimming the hairline. Pull back the hair that you do not plan to cut with the comb. This will help avoid accidental cuts of the rest of your hair.
- Third step – The best method to lower the frontal hairline is to trim in a downward motion. Keep in mind, you should have a 1.5 guard attached to the hair trimmer before cutting down your hairline. Again, the distance between the natural hairline and the second created hairline should be 1 ½ centimeter at most.
Once you’ve completed the hairline trim down you’re able to move on to the next step of lining your hairline. Note, once the trimming is complete you would then apply the hold spritz via hairbrush to keep the hairline in place. Do not apply the holding spray in your hair before you trim the hairline down.
Hairline symmetry for line up techniques
The key to a good hairline shape up from home is symmetry. The last thing you want during DIY edge up is a bad lining because your hairline is sloped. The line up method below will help you avoid those line up problems.
Uneven frontal hairline shape up
When starting your hairline edge up, start with the T-Outline at the center of the hairline. From the center, gently tap your way across the frontal line towards the thinner or high side of uneven hairlines. Doing this will allow you to straighten the difficult portion of the hairline. Once you have edged the weak side to satisfaction, work your way across to the other side of the hairline.
Note, you may have to adjust the other side of the starting point to even it out with the receding area of the hairline. Meaning, you may have to push back the non-receding area of the hairline to keep it straight and even.
Even hairline line up
When you have a full hairline the concept of lining up yourself is the same… Start from the center of the hairline and gently work your way to one side of the hairline. Once you’ve achieved a sharp line up in the initial side you chose, work your way to the other side.
Note, you will not need to push back the hairline. The only time you may need to adjust the frontal hairline is if you made a mistake during the shaping phase.
Edging your back neckline
Let me inform you if you don’t already know, lining up the rear neckline is very different from shaping the frontal hairline. The self line up of the rear hairline can be difficult if you do not use the proper technique. It is quite simple once you follow the outline and visualization steps I provided earlier in the article. When every step is followed correctly, the line up haircut should take about 15 minutes… Not bad at all, right?
To shape the back hairline, you will need two mirrors to view the back of your head. Note, this part of the DIY hairline cut will require steady hands and focus. This is where you will put your hand-eye coordination to the test!
Make sure that you can see the shape up outline that you drew behind your head during the hairline preparation phase. Once you have a view of the outline you can then begin to edge the rear neckline with your T-outliner.
Lining the sides of the rear hairline
While holding the mirror with your non-dominant hand, use your dominant hand to line up the neckline with your clipper. Be sure to hole the hairline edgers comfortably and angling parallel to the side of the neckline behind the ear hairline curvature. When you line up the rear hairline make sure you go slowly in a down and outward direction.
While shaping your neckline be careful not to push in the line while edging the side of your rear hairline. This will cause the path of the back hairline to look unnatural and uneven.
Shaping the bottom of the rear neckline
Once you’ve edged the sides of your rear neckline, it’s time to move on and shape up your tail hairline. This section of the shape up tutorial focuses on how to line up the bottom of the back hairline. I’ll give you three examples of back hairline types and how two shape them up.
3 Types of back hairline
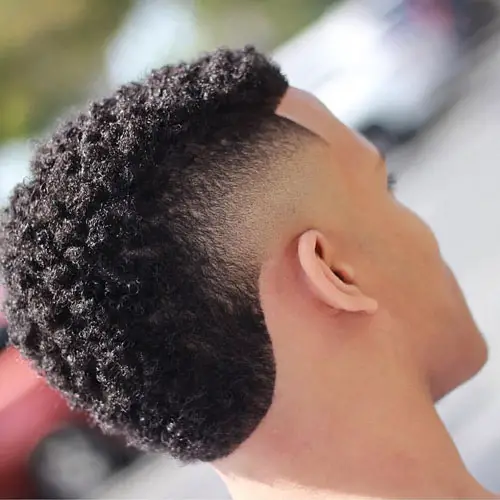
- Curved back hairline – The curved rear hairline is exactly what it sounds like… The hairline in the back of the head is rounded off.
- Lining up the curved back neckline – In this phase of shaping the rear neckline, you will need to round out the bottom of the back line. Keep your mirror in the non-dominant hand with a good view of the back of your head. You will then take the T-outliner with your dominant hand to edge the tail hairline in a rounded form. When lining the back line, you should gently tap the clippers in a down outward direction to get the curved hairline. Note, the hairline in the back should already have a curved outline traced with a barbers pen.
- square back hairline – The boxed back hairline has a sharp 90-degree angle at the corners and flat at the bottom. This is where the hairline type lends its name square or boxed from.

- Edging up the boxed back hairline – Lining the box back neckline is similar to the rounded rear hairline in the sense of its starting point. Again, hold the mirror in non-dominant hand with a clear view of the back neckline. From there, take the T-outliner with your dominant hand to edge the tail hairline in a square form. Tap the liners along the rear hairline gently downward and outward direction. The rear square hairline should be flat at the bottom and should already be traced with a barber pen.
Tapered rear neckline

- Taper back hairline – This type of back hairline is tapered which is often close to the skin. The faded back neckline has low visibility but could either be rounded out or squared.
- Fading and shaping tapered back hairline – The process of lining the tapered neckline is a little different than lining the other two shape up types. For this hairline shape up, you will need a hair trimmer, 1.5 guard, a comb, a t-outliner, and a hairbrush.
The faded neckline shape up is difficult to execute on your own and there’s a higher chance for error if you’re a beginner. I do not suggest performing the faded neckline if you’re a novice barber. Don’t worry, I will write a detailed article on how to fade the neckline later on for those of you who are more advanced.
The back of the head is the most difficult part of the barber line up technique. Some may even be intimidated by the idea of shaping their own neckline. The detailed guide that I’ve written should simplify the process of edging the neckline.
Conclusion
The barber line up technique is the key to a cleaned shape up from home! One of the first things people notice about a fresh haircut is how straight your hairline looks. The DIY line up techniques in this article will help reduce barber visits… This is especially beneficial as it reduces your chance of exposure to the current health crisis.
The tools needed for a self-edge up could be purchased either at your local beauty supply store or conveniently through Amazon.com. Whether you’re on a budget or not, it is a good idea to price check the barber equipment before buying. This will allow you to invest in your in-home barbershop without exceeding your budget limit.
Hopefully, you found this step-by-step barber line up techniques guide helpful. Don’t be selfish and pass this article along to someone who may need it. The community is growing beyond my wildest dream… Thank you guys out there, I could not do it without you all! Let’s continue to build our community together, please like, share, and leave comments below!
If you enjoyed this article and found it useful, please like, subscribe, and share! Also, read the other article from AfroCurlsandCuts.com
- 7 Best Clipper Set for Barbers
- 9 Tools Black Barbers use for Fade Haircuts
- 5 Trendy Taper hairstyles inspired by curly afro for men under 21
- 10 Best Foil Shaver for Black Men Under $100
- 10 Best Head Shavers for black bald heads
- 10 Best T Liner For Black Bald Head
- 16 Best Blowdryers for Locs