We may earn money or products from the companies mentioned in this post.
What’s All the Fuss about T-Outliner Tension Springs?
T-outliner tension spring is such an intimidating name for something so easy to fix whenever your hair clipper breaks.
Sure, you’re new to the term T-outliner tension spring and likely wouldn’t mess with it until you have issues with your trimmers. Let’s deep dive a bit and become formalized with tension spring in trimmers.

Amazon Audible Premium Plus Annual Membership is the way to go if you’re looking for an affordable way to enjoy your favorite books.
Click here for Amazon Annual Audible Membership!
What’s a T-Outliner Tension Spring?
The Andis T-Outliner features a tightly coiled spring that works when “tension” is applied to them. The tension of the Andis T-Outliner Tension Spring is determined by how tightly the two blades are stacked together. If there isn’t adequate tension and the blades are squeezed tightly enough in the right position, this can hinder cutting power.
Don’t Give Up Yet; let’s talk about it!
Isn’t it incredibly frustrating when your trimmer just won’t cut properly? Well, imagine getting a WTG 1.5 haircut or attempting to fix a messed-up hairline with a defective tension spring. Talk about serious frustration and near impossible cutting your hair at home.
I’m sure you’re thinking it’s time to buy a new hair clipper, but maybe you can salvage your existing ones. Before you go out and buy new hair-cutting equipment, consider replacing the tension spring in the T-Outliner. Side note, ideally the blades need to be changed once a year to keep them from going dull or rusting. However, in certain cases, the tension may be at fault here.
You can easily replace the tension spring in T-Outliner in a few simple steps. All you need is a replacement spring, a screwdriver, a nut twister, and your hair-cutting tool!
T-Outliner Tension Spring: Functions
A tension spring effectively distributes “tension” in the right position, resulting in the blade being sturdy and the trimmer working smoothly. If you’ve overstressed the tension spring on a T-Outliner, the trimmer won’t react to you adjusting the spring either. Once this has happened, the hair liners become ineffective, and it’s time to replace it.
Two Things that You Should Know
Regardless of whichever blade you put in your clipper, there are two things that are the most important. One, the blade should be sharp, and the tension spring should be adjusted in the right place. If the tension spring isn’t pulling right, you can expect a headache from your trimmer even if the blade is sharp.
T-Outliner Tension Spring: Replacement to Give You a Better Trim
If your trimmer isn’t functioning properly, it’s easy to end up with a haircut or shave that you will absolutely regret the next morning (or the next hour). Also, check out a great article that I’ve how to edge up with straight razors and clippers for a perfect hairline.
Some More Tips
Barbers will constantly examine their trimmers to ensure the smoothest cuts and hassle-free work. If you ask a barber about barber school, they’d tell you it’s a long and expensive process option. However, there are less expensive and effective options of learning to cut hair.
Also, check out 3 tips that fix line up when the barber messed up the hairline! After all, mistakes can be made by anyone!
If you got a bit too brave at home and tried to pull off some dare moves that could ruin your beautiful Afro curls, make sure you read our 5 quick tips to prevent and fix messed-up haircuts.
Another frequently asked question is: Can dreads with fade in front ease tension on the hairline? Read our answer here.
How to Replace a T-Outliner Tension Spring?
Although it sounds complicated with all the disassembling and replacing items, changing the tension spring of a T-Outliner is actually easier than you thought.
Here’s What You Will Need:
- One Andis All Clipper Blades Replacement Tension Spring
- One screwdriver
- One nut twister (5 mils) – highly recommended; can choose spanner if you can be extra gentle
- T-Outliner or Trimmer
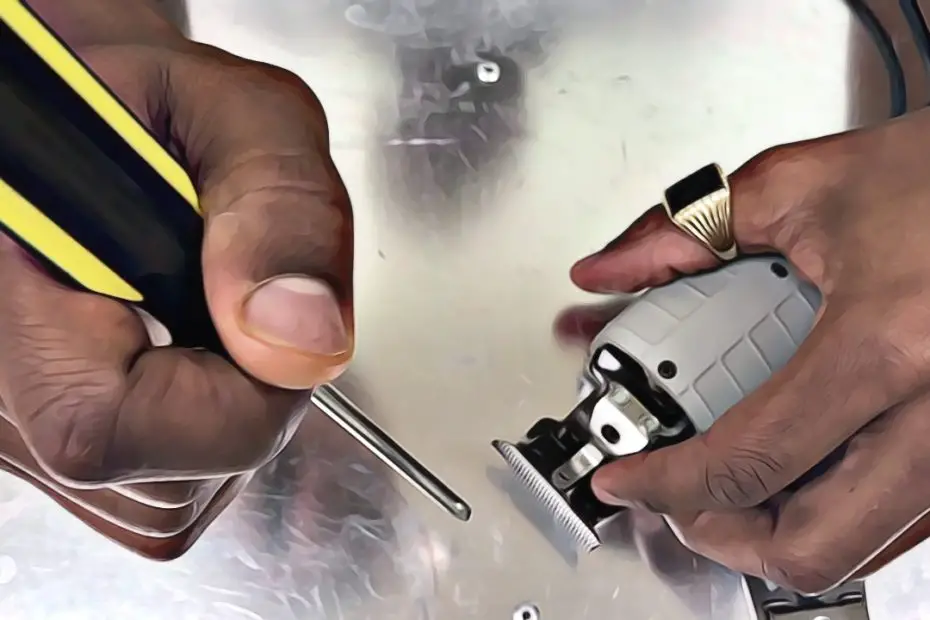
First five steps to locating and removing tension spring
- In the U.S models, there should be two screws on the upper part of the trimmer. Unscrew them and gently take the screws out, preferably placing them on a corrugated mat.
- Remove the power outlet that connects the handle to the core. The wires are extremely delicate and must be handled with care. Refrain from pulling on anything.
- The tension spring is located at the neck of the machine – the lean bridge connecting the body with the head of the trimmer. A tension spring that needs to be changed will look bruised and battered.
- Use the screwdriver to take out the sole screw on the topmost part of the tension spring.
- Take your nut twister and loosen the two nuts at the base of the tension spring. Don’t exert too much pressure on it.
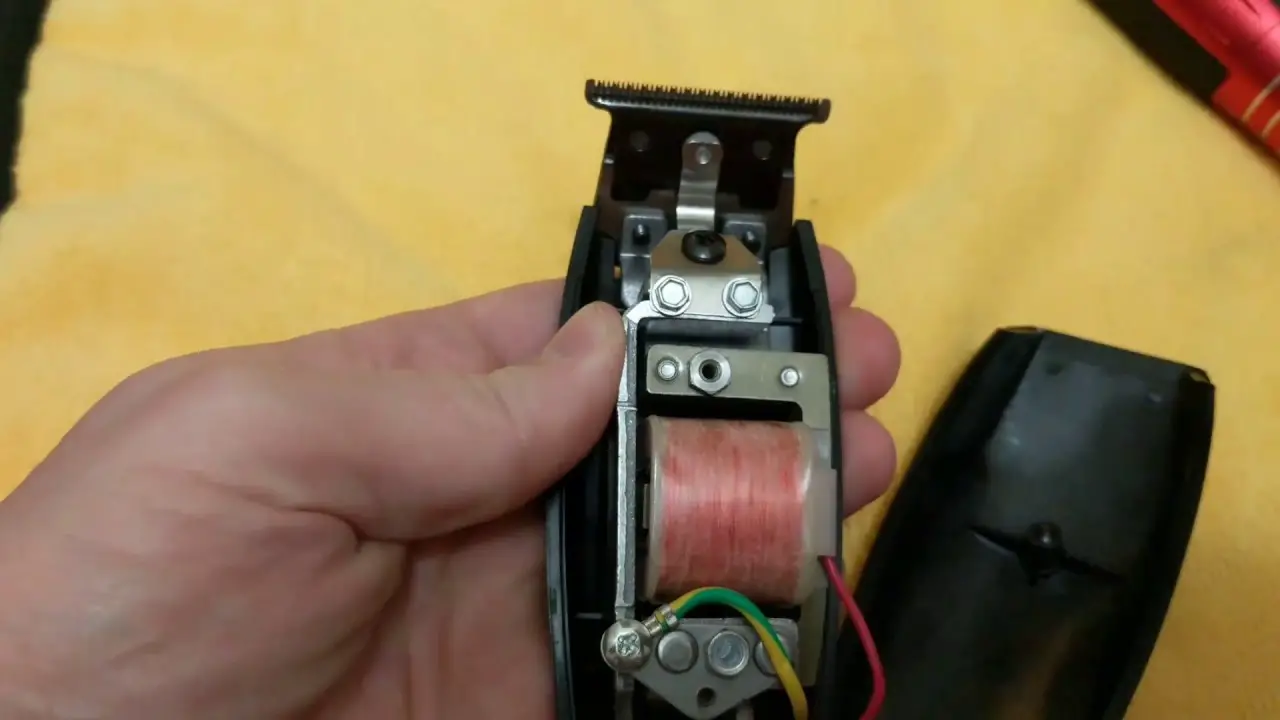
Next 7 steps for replacing a spring tension in a T outliner
- Take the new replacement tension spring and pop it between the two holes. In the blade, you’ll notice a hole in the middle, and that’s where the screw will go. Secure the tension spring.
- Use your nut twister to secure the tension spring to the armature.
- Reinsert the tension screw in the middle and tightly secure it in place. Look through the hole to know exactly where the spring is so you can position it just right; otherwise, it won’t work right.
- To get the tension right back to the first position, the best way is to have a little sliver of a half-moon of a void between the tension spring and the blade. Turn the screwdriver till you notice the crescent shape.
- You’re almost done here. Make sure all the wires in the body should be carefully placed in the notch of the cover. Let everything sit properly inside the cut-out notch in the armature.
- Fold the wires back and use the trimmer case to close the device. Check to make sure none of the wires are sticking out.
- Reinsert the screws and tighten them up. You’re done!
For those of you who are visual people, I’ve also added a great step-by-step video “Replacing Tension spring for better performance,” by Larry the Barberman on YouTube.
That’s how you replace a tension spring on a T-Outliner. The half-moon spring can be customized depending on how much you want to adjust your trimmer. Now, the process might seem daunting and lengthy, but you’ll realize it only takes a few minutes to follow through with the instructions.
Sign up for our awesome Newsletter!

Newsletter
Sign up for Afrocurlsandcuts.com newsletter to be first notified of events, promotions and most importantly fresh blogs articles!
Hold Up!
If you want the complete professional experience at home, or you’re an aspiring barber, you absolutely need a stellar trimmer to get you started. Check out ANDIS Professional Barber Combo – CL-66325 on Amazon for a quality cut experience and noticeable results! The sleek design and great features make it one of the best choices on Amazon for barbers and amateurs all over.
Conclusion
Hopefully, you have a better understanding of the function of what the tension springs and how to replace it. Seriously, you cannot beat the benefits of replacing a T-outliner tension spring in under five minutes! This will help preserve your hair clippers for many years to come.
It’s really not that complicated. Make sure to follow the instructions properly and keep the equipment at hand. If you want some amazing hair care tips, make sure to drop by AfroCurlAndCuts.com for more! And if you liked this piece, make sure you like, subscribe, and share. This will help keep building our community and be helpful to many more people.